Welcome to Moda Fabrics!
December 17: All Wrapped Up
December 17: All Wrapped Up
Published:
Dec 16 2019 - 23:00

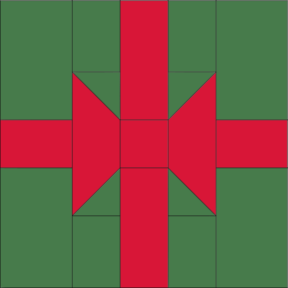
Welcome back for Day 18 of the Moda Bake Shop's Countdown to Christmas. I'm Jen Daly and I'm so excited to share my "All Wrapped Up" block with you today. This simple block was inspired by beautifully wrapped gifts tied up in colorful bows. With its bigger pieces, it's a great opportunity to showcase your favorite Christmas fabrics. And if you like, use one print for the ribbon and another for the bow that sits atop the package. Make it your own and have fun!
This blocks finishes at 6" or 12" square.
![]()
| 6" Block | 12" Block | ||
|---|---|---|---|
| From green print, cut: | From green print, cut: | ||
| (4) 2" x 3" rectangles | (4) 3½" x 5½" rectangles | ||
| (4) 1½" x 2" rectangles | (4) 2½" x 3½" rectangles | ||
| (4) 1½" x 1½" squares | (4) 2½" x 2½" squares | ||
| From red print, cut: | From red print, cut: | ||
| (2) 1½" x 3½" rectangles* | (2) 2½" x 6½" rectangles* | ||
| (2) 1½" x 3" rectangles | (2) 2½" x 5½" rectangles | ||
| (2) 1½" x 2" rectangles | (2) 2½" x 3½" rectangles | ||
| (1) 1½" x 1½" square* | (1) 2½" x 2½" square* |
*If you'd like to have the bow be a different print from the ribbon on your block, use a third print for the pieces marked with an asterisk above.
![]()
The following instructions are for the 6" block. The 12" block is made exactly the same way, but the 12" block patch sizes are listed in the brackets [].
Make Bow Units
- On the wrong side of 4 green print 1½" squares [2½" squares], use a pencil to lightly draw a diagonal line from corner to corner. Layer a marked green print 1½" square [2½" square] atop a red print 1½" x 3½" rectangle [2½" x 6½" rectangle] with right sides together as shown and stitch the pair together on the drawn line. Be mindful of the orientation of the stitching line.

2. Trim seam allowance to ¼" and press toward the red print.
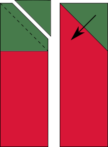
3. Repeat steps 1 and 2 at the opposite end of the red print 1½" x 3½" rectangle [2½" x 6½" rectangle], paying careful attention to the orientation of the stitching line. Repeat to make 2 bow units.

Assemble Block:
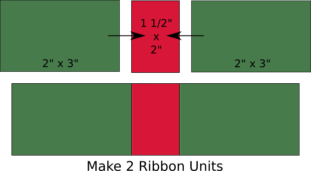
- Stitch together 2 green print 2" x 3" rectangles [3½" x 5½" rectangles] and 1 red print 1½" x 2" rectangle [2½" x 3½" rectangle] with the red print rectangle in the middle as shown. Press seam allowances toward the red print. Repeat to make 2 ribbon units.
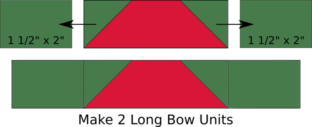
2. Stitch together 2 green print 1½" x 2" rectangles [2½" x 3½" rectangles] and 1 bow unit with the bow unit in the middle as shown. Press seam allowances toward the green print. Repeat to make 2 long bow units.
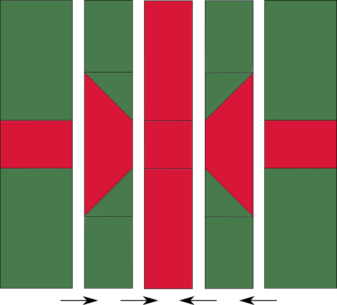
3. Stitch together 2 red print 1½" x 3" rectangles [2½" x 5½" rectangles] and 1 red print 1½" x 1½" square [2½" x 2½" square] with the red print square in the middle as shown. Press seam allowances toward the square to make a center ribbon unit.

4. Lay out 2 ribbon units, 2 long bow units and 1 center ribbon unit in vertical rows as shown. Stitch together all units. Press seam allowances toward the center to finish the block.
![]()
One 6" or 12" festive All Wrapped Up block.

Thank you so much for following along with me today and have fun making your blocks!
Jen Daly
{blog: JenDalyQuilts.com}
{instagram: /jendalyquilts}
{shop: Etsy.com/shop/JenDalyQuilts}
{facebook: /jendalyquilts}
![]()
Posted in:
Comments