Welcome to Moda Fabrics!
Garden Gifts
Garden Gifts

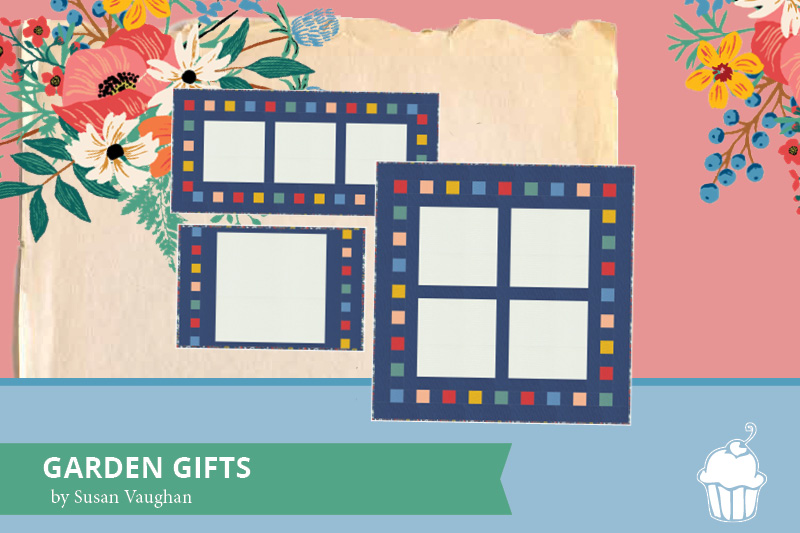
One of summer’s annual traditions for the Moda Bakeshop is to hold a quilt-along. We all anxiously gather our fabric with the intention of making a lovely throw-sized quilt while we spend our summer relaxing by the pool. All too often for me, summer takes on other plans. Impromptu beach picnics, playdates, and the never-ending yardwork and gardening, often leave me with less sew time than I think. Even though I start strong, and keep up with the first couple of blocks, I start to fall behind.
Instead of feeling frustrated or disappointed in myself for creating another unfinished project, I often will turn my extra blocks into small projects to use in my house or to keep in my “gift cupboard” for when I need a small unexpected gift. All three of these projects would be perfect to take as a hostess gift to a neighborhood barbeque or get together.
I designed these three projects as a way to use up any orphan or test blocks you might have from the Garden Quilt-Along, but the setting would also work for any other orphan blocks you might have. So, grab those extra blocks, and block out an afternoon for sewing and you will have a finished project before you know it! Be sure to check out my Instagram feed (@thefeltedpear) throughout the summer for additional ideas to use up your orphan blocks.
NOTE: There are three separate instructions below. The PRINTER FRIENDLY link at the bottom of the post has a printable version of ALL instructions together.
TABLE RUNNER

![]()
24½ ” x 52½ ”
![]()
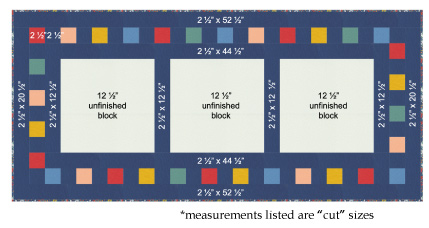
- (3) 12 ½” unfinished blocks
- (32) 2 ½” x 2 ½” Scraps from your favorite prints or solids
1 yard background, cut (11) 2½” x WOF strips. Subcut:
- (32) 2 ½” squares
- (4) 2 ½” x 12 ½” sashing
- (2) 2 ½” x 20 ½” borders
Sew remaining strips together and cut into:
- (2) 2 ½” x 44 ½” borders
- (2) 2 ½” x 52 ½” borders
Backing: 2 yards
Binding: 3/8 yard
![]()
Step 1: Sash 12 ½” unfinished squares as shown with 2½” x 12½” sashing strips. Add 2½” x 44½” borders to the top and bottom.
Step 2: Make left and right checkerboard borders. Sew (4) 2 ½” print squares with (4) 2½” background squares. Unit measures 2½” x 16½”. Make two. Attach to the left and right sides,paying attention to rotate the units as shown in the diagram.Make top and bottom checkerboard borders by combining (12) 2 ½” print squares with (12) 2½” background squares. Attach to the top and bottom making sure to rotate the units as shown.
Step 3: Attach 2½” x 20½” borders to the left and right, and 2½” x 52½” borders to the top and bottom. Table runner measures 24½” x 52½”.
Step 4: Quilt as desired. Bind with (4) 2½” strips of fabric.
PLACEMAT

![]()
13½” x 20½”
![]()
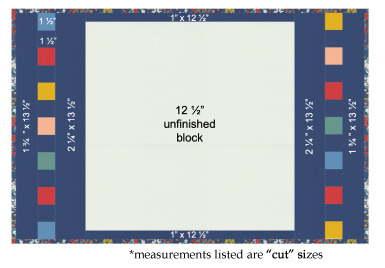
(1) 12 ½” unfinished block
(14) 1 ½” x 1 ½” print scraps
From Background (¼ yard) Cut:
- (2) 1” x 12 ½” rectangles
- (2) 2 ¼” x 13 ½” rectangles
- (2) 1 ¾” x 13 ½” rectangles
Backing: 15” x 22“rectangle
Binding: ¼ yard
NOTE: Materials listed for 1 placemat.
![]()
Step 1: Make left and right checkerboard strips. Combine (7) 1 ½” print squares with (6) 1 ½” background squares as shown, starting and ending with a print square. Border measures 1 ½” x 13 ½” unfinished.
Step 2: Attach 1” x 12 ½” rectangles to the top and bottom of the 12 ½” unfinished block.
Step 3: Add 2 ¼” x 13 ½” to the left and right sides of the 12 ½” block.
Step 4: Add checkerboard strips to the left and right side of the placemat and finish by adding 1 ¾” strips.
Step 5: Quilt as desired. Bind with (2) 2 ½” strips of fabric.
TABLE TOPPER

![]()
39½” square
![]()
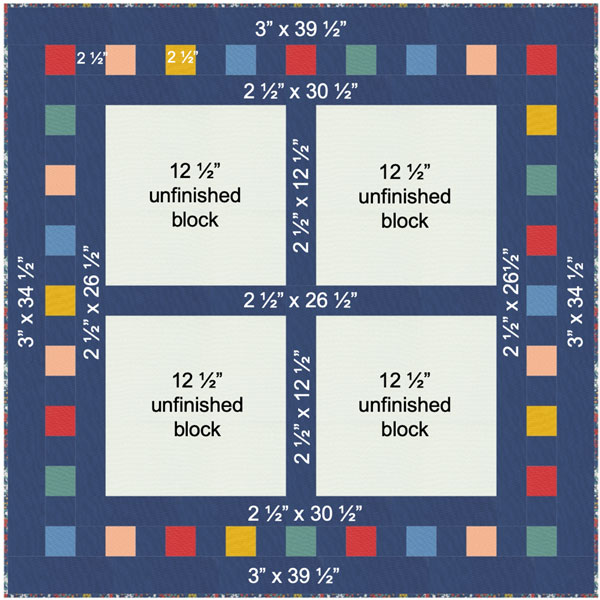
[A] (4) 12½” unfinished blocks
[B] (32) 2½” x 2½” print scraps
From 1 yard of background fabric, cut:
(5) 2½” x WOF strips. Subcut:
- (2) 2 ½” x 12 ½” sashing
- (3) 2 ½” x 26 ½” sashing
- (2) 2 ½” x 30 ½” rectangles
- (32) 2 ½” squares
(4) 3” x WOF strips. Subcut:
- (2) 3” x 34½” border
- (2) 3” x 39½” border
Backing: 2¾ yards of 40” fabric
Binding: 3/8 yard
NOTE: Depending on your quilting preferences and width of fabric, you may be able to back your project with 1 ¼ yard of fabric.
![]()
Step 1: Make left and right checkerboard strips. Combine (7) 1 ½” print squares with (6) 1 ½” background squares as shown, starting and ending with a print square. Border measures 1 ½” x 13 ½” unfinished.
Step 2: Attach 1” x 12 ½” rectangles to the top and bottom of the 12 ½” unfinished block.
Step 3: Add 2 ¼” x 13 ½” to the left and right sides of the 12 ½” block.
Step 4: Add checkerboard strips to the left and right side of the placemat and finish by adding 1 ¾” strips.
Step 5: Quilt as desired. Bind with (2) 2 ½” strips of fabric.
TABLE TOPPER

![]()
39½” square
![]()
[A] (4) 12½” unfinished blocks
[B] (32) 2½” x 2½” print scraps
From 1 yard of background fabric, cut:
- (5) 2½” x WOF strips. Subcut:
- (2) 2 ½” x 12 ½” sashing
- (3) 2 ½” x 26 ½” sashing
- (2) 2 ½” x 30 ½” rectangles
- (32) 2 ½” squares
(4) 3” x WOF strips. Subcut:
- (2) 3” x 34½” border
- (2) 3” x 39½” border
Backing: 2¾ yards of 40” fabric
Binding: 3/8 yard
NOTE: Depending on your quilting preferences and width of fabric, you may be able to back your project with 1 ¼ yard of fabric.
![]()
Step 1: Assemble (2) 12 ½” unfinished blocks with 2 ½” x 12 ½” sashing strip into a row. Make two. Combine with a 2 ½” x 26 ½” sashing strips and add 2 ½” x 30 ½” strips as shown.
Step 2: Make Checkerboard border. Combine (8) 2 ½” background squares with (7) 2 ½” print scrap squares, starting and ending with a background square. Unit measures 2 ½” x 30 ½”.
Attach to the left and right side of the quilt.Combine (9) 2 ½” print scrap squares with (8) 2 ½” background squares starting and ending with a print square. Unit measures 2 ½” x 34 ½”. Attach to the top and bottom of the quilt.
Step 3: Attach 3” x 34 ½” borders to the left and right sides, and 3” x 39 ½” borders to the top and bottom of the quilt.
Step 4: Quilt as desired and bind with (5) 2 ½” strips of fabric.
Susan Vaughan
instagram: @thefeltedpear
Find all Summer in the Garden posts by clicking {HERE}.

Comments